Write by lyc at 2020-3-25CentOS 7 部署 Elasticsearch7.4 集群并进行安全认证 x-pack 安装注意事项
一、elasticsearch 7.5.1 配置安全认证 Elasticsearch官方宣布免费提供部分安全管理功能,发布内容在6.8.0和7.1.0版本中,详细内容请查看官网博客说明:https://www.elastic.co/cn/blog/security-for-elasticsearch-is-now-free
免费版本提供的基础认证功能:
TLS 功能,可对通信进行加密
文件和原生 Realm,可用于创建和管理用户
基于角色的访问控制,可用于控制用户对集群 API 和索引的访问权限
通过针对 Kibana Spaces 的安全功能,还可允许在 Kibana 中实现多租户
1.生成证书 在主节点上创建证书,拷贝证书到其他节点的相同路径下
1
2
3
$ mkdir -p /etc/elasticsearch/certs $ cd /usr/share/elasticsearch/bin $ ./elasticsearch-certutil cert -out /etc/elasticsearch/certs/elastic-certificates.p12 -pass ""
2.开启TLS集群通信认证 /etc/elasticsearch/elasticsearch.yml 所有节点配置开启TLS集群通信认证
1
2
3
4
5
6
7
$ vim /etc/elasticsearch/elasticsearch.yml xpack.security.enabled: true xpack.license.self_generated.type: basic xpack.security.transport.ssl.enabled: true xpack.security.transport.ssl.verification_mode: certificate xpack.security.transport.ssl.keystore.path: /etc/elasticsearch/certs/elastic-certificates.p12 xpack.security.transport.ssl.truststore.path: /etc/elasticsearch/certs/elastic-certificates.p12
所有节点重启elasticserach服务生效
1 $ systemctl restart elasticsearch
3.为elasticserach集群配置密码 两个命令可以来设置连接elasticsearch的密码:
bin/elasticsearch-setup-passwords auto 为各种内部堆栈用户生成随机密码bin/elasticsearch-setup-passwords interactive 手动定义内部堆栈密码在集群中的任何一个节点上生成密码都可以,一个节点生成后会同步至集群
1
2
3
4
5
6
7
8
9
10
11
12
13
14
15
16
17
18
19
20
21
22
23
24
$ cd /usr/share/elasticsearch/bin $ ./elasticsearch-setup-passwords auto Initiating the setup of passwords for reserved users elastic,apm_system,kibana,logstash_system,beats_system,remote_monitoring_user. The passwords will be randomly generated and printed to the console. Please confirm that you would like to continue [y/N]y Changed password for user apm_system PASSWORD apm_system = edmmLwX7D1xCFMvWRE0Q Changed password for user kibana PASSWORD kibana = 6IUIvu2ulXfELkJTISWm Changed password for user logstash_system PASSWORD logstash_system = jpy2TYiCkS4XyVcPUY7y Changed password for user beats_system PASSWORD beats_system = sxcTQbJGKl9R7T7w2KK4 Changed password for user remote_monitoring_user PASSWORD remote_monitoring_user = WayO2HEatHwXvBLZTXkT Changed password for user elastic PASSWORD elastic = $password
修改用户密码 elastic 用户拥有全部的权限,通过如下的接口可以更改密码,示例:{username} 占位符代表需要修改密码的用户。
$newpassword 改为新密码
1
2
3
4
curl -XPUT -u elastic 'localhost:9200/_xpack/security/user/{username}/_password' -H "Content-Type: application/json" -d '{ "password" : "$newpassword" }'
4.验证elasticsearch集群密码 这个时候不带密码使用curl命令会失败的,因为集群通信认证了以后,我们再去curl访问是会询问账号的
1
2
3
4
5
6
7
8
9
10
11
12
13
14
15
16
17
18
19
20
21
22
$ curl 192.168.100.161:9200 {"error" :{"root_cause" :[{"type" :"security_exception" ,"reason" :"missing authentication credentials for REST request [/]" ,"header" :{"WWW-Authenticate" :"Basic realm=\"security\" charset=\"UTF-8\"" }}],"type" :"security_exception" ,"reason" :"missing authentication credentials for REST request [/]" ,"header" :{"WWW-Authenticate" :"Basic realm=\"security\" charset=\"UTF-8\"" }},"status" :401} $ curl -u elastic:$password 192.168.100.161:9200 { "name" : "node-100161" , "cluster_name" : "tz-inner-es" , "cluster_uuid" : "yGt96E-AQP6jV9dVKDtBwg" , "version" : { "number" : "7.5.1" , "build_flavor" : "default" , "build_type" : "rpm" , "build_hash" : "3ae9ac9a93c95bd0cdc054951cf95d88e1e18d96" , "build_date" : "2019-12-16T22:57:37.835892Z" , "build_snapshot" : false , "lucene_version" : "8.3.0" , "minimum_wire_compatibility_version" : "6.8.0" , "minimum_index_compatibility_version" : "6.0.0-beta1" }, "tagline" : "You Know, for Search" }
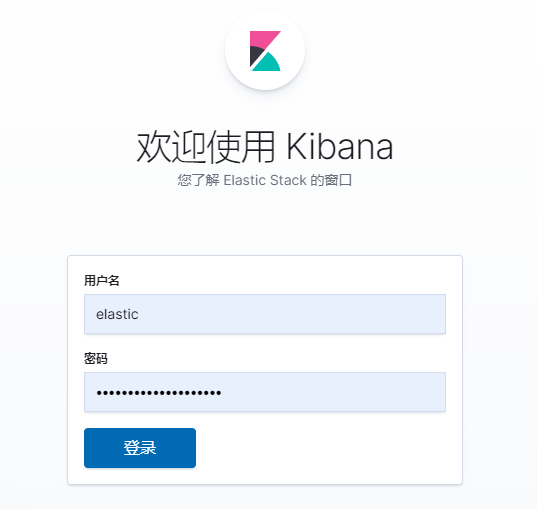
二、kibana 7.5.1 配置es密码访问 1./etc/kibana/kibana.yml 1 2 3 4 5 6 7 8 9 10 $ vim /etc/kibana/kibana.yml server.port: 5601 server.host: "0.0.0.0" server.name: "tz-inner-es-kibana" elasticsearch.hosts: ["http://192.168.100.161:9200" ] elasticsearch.preserveHost: true kibana.index: ".kibana" elasticsearch.username: "kibana" elasticsearch.password: "6IUIvu2ulXfELkJTISWm" i18n.locale: "zh-CN"
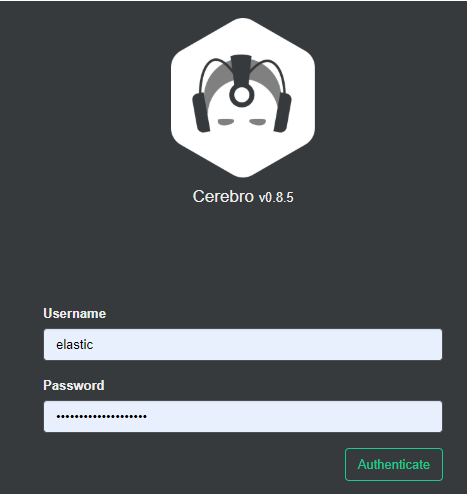
三、可视化插件安全认证 所有和elasticsearch集群交互的,都需要安全认证
1.Cerebro Cerebro 插件按原来的方式访问即可,会弹出对话框输入安全认证账户。
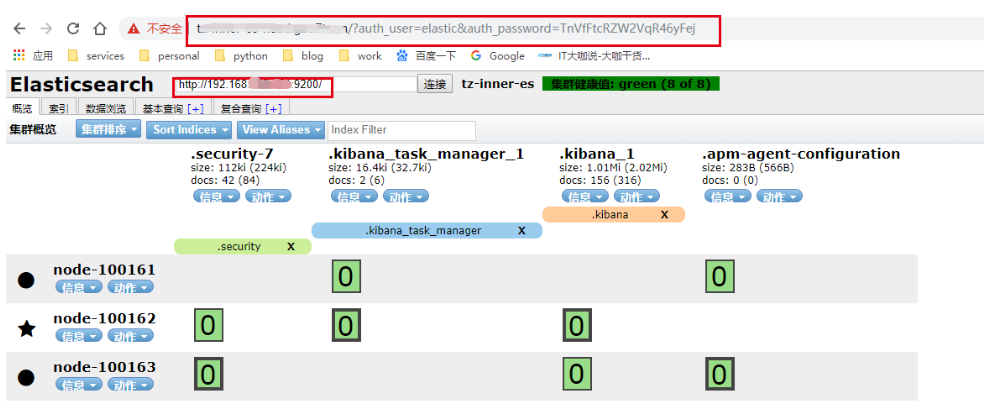
2.head 插件配置
x-pack 安装注意事项
/etc/elasticsearch/elasticsearch.yml 之前的访问都是通过http://127.0.0.1:9100即可,安装x-pack之后,首先需要更改elasticsearch.yml的配置:
1 2 3 4 5 $ vim /etc/elasticsearch/elasticsearch.yml http.cors.enabled: true http.cors.allow-origin: "*" http.cors.allow-headers: Authorization,Content-Type
传参访问 head 1 2 3 4 5 # 浏览器直接访问head 9100 http://192.168.100.161:9100/?auth_user=elastic&auth_password=$password # 通过域名nginx 反代访问head http://tz-inner-es-head.gao7ts.cn/?auth_user=elastic&auth_password=$password